 Quilting Supplies – What you need to keep on hand
Here are some basic quilting supplies that you will need to keep in stock.
Quilting Fabric
Yep. That’s obvious.
Quilters refer to the quilting fabric they have on hand as their “stash.” Sometimes stashes can get quite high. There’s even a stashbusters online yahoo group to help fabicholics.
The good thing is that you will probably gravitate toward a certain style. I mean, I was surprised when “magically” I had enough fabric for a stash, scrap quilt and everything matched.
Like there are clothing lines, there are a ton of different quilt fabric lines. You can count on most to stay near their niche. Amy Butler is modern. Moda? You will probably get a traditional type of quilt. Michael Miller features more novelty fabric.
It’s good to be aware of the different types of fabric lines so that you can know where to go when you’re looking to make a specific kind of quilt. When it comes to quilting supplies, fabric is on the top of the list.
Thread
If you have a basic sewing machine, you can use good old Dual Duty. It’s what is in my machine. If you can, however, get your hands on some Gutermann thread. If you have a high end machine, it is a necessity.
As for colors, buy neutral thread for piecing. For my bright quilts, I use white thread. For my darker quilts, I like beige. Keeping your piecing thread neutral means that you can really take advantage of the big box fabric store sales on thread.
Quilt Batting
Ah, batting can be the most confusing choice when it comes to quilting supplies. There are a couple of questions that you need to ask yourself before you choose the right batting for a project.
What will this quilt be used for? You can get away with a different batting for a wall hanging than one that you are hoping will become a little one’s favorite blanket. Baby quilts will probably be washed and dried a lot. You will need a batting that will hold up to all of that abuse, uh, I mean loving.
Is warmth important? Would the recipient of the quilt be happier with a quilt that is backed with fleece because it would be warmer? In that case, you may be able to forgo batting all together.
And this is may seem shallow but notice how far apart the batting needs to be quilted. Do you really want to quilt every four inches? I don’t. I know this would drive me crazy and I’d only use batting like this for a small wall hanging.
Then again, the quilts I make are for every day use and probably wouldn’t make it past a cursory glance of a quilt judge. If you aspire to hand quilt a masterpiece or to use a long arm machine, then quilting every four inches could be the perfect batting for you.
It’s all about intended use. Once you know what kind of quilt you want to produce, choosing the batting becomes easy.
Tip – Buy the largest piece of bagged batting you can when it is on sale. You can always cut it up for smaller projects.
Quilt Labels
You can make your own quilt label with a piece of muslin and a permanent fabric pen. Write your name, the date, the intended recipient and the name of the quilt on the scrap of fabric. Then, stitch this to the back of the quilt.
There are also some quilt labels that are produced by fabric companies. The first quilt label I used was from a Christmas fabric line. I used some Wonder Under to apply it to the back of the quilt so that it stuck. Although Wonder Under is supposed to be permanent, I really should have stitched it down.
Another alternative is to sign the back of the quilt, directly mark on the quilt with again, a permanent, fabric pen.
So, there you have it – fabric, thread batting and labels. You can never go wrong stocking up on these basic quilting supplies.
==========================gtg
Quilt Book – Valuable Books for Your Quilting Library
Looking for a quilt book to start or add to your quilting library? There are three types that you’ll need – reference, pattern and inspirational.
The Reference Book or How do I Do That Again?
Most quilting books of any kind will include basic instructions on how to quilt. But, unless they are a beginning quilting book, that is all that they will contain.
Even beginner quilting books will not contain a lot of information because they want to make things as simple as possible for the beginning quilter. You will usually only get one way to perform a quilting technique such as binding a quilt with a minimal amount of pictures.
So, what’s the solution? A reference quilt book. A reference book will give you options. Instead of one way to baste a quilt, for example, you may get three with step-by-step instructions.
Sometimes even a pattern book can be used as a reference book if the General Instructions section is good enough.
The thing to remember about reference books is that you pull them out when you want to know how to do something. That can be a quilting technique or even how to complete a quilt in 90 minutes. It’s a good quilt book to have in your arsenal.
The Pattern Book or The Good Stuff
This is what most folks think of when they think of a quilt book. A pattern book is just that – a book of patterns. When looking for this type of book, look at what techniques you are familiar with.
If you a strip quilting type of person, look for a book that contains strip quilting instructions . Do you love fat quarters? There are plenty of fat quarter specific books out there. Want to try scrap quilting? There’s a book for that. It’s also a good idea to have a pattern book that is just above your current level . This book should should stretch you and force you to try new techniques or develop the patience that it takes to make a beautiful quilt.
I usually have a rule of three when it comes to pattern books – I’ve got to be interested in making three quilts from the book. That makes the book cost effective when it comes to purchasing a book versus individual patterns.
The main piece of advice that I can give you to make sure that either you are comfortable with the techniques in the instructions of the pattern quilt book or you are ready to make the next leap in your quilting development.
Inspirational Book or Ooh and Aah
Some may call these coffee table books. They are usually huge and oversized. I like just looking at them and getting inspired to quilt and also for quilt designs.
Some books, like Quiltmaking by Hand by Jinny Beyer are supposed to be instructional/reference books, but I get inspired by flipping through them because of their intricate quilts.
I also have the book from the Gee’s Bend museum exhibit that traveled the country. That book reminds me that you can make art out of anything.
Those women used what they had, they broke the rules and in the process of making a functional quilt to keep them warm, they made art.
If that isn’t inspirational, I don’t know what is.
So, if you are looking to start or add to your quilting library, consider a good balance between reference, pattern and inspirational books. A good mix will allow you to get more quilts finished, while still pushing you to become a better quilter. And isn’t that what we all want?
===================gtg
Memory Quilt Ideas
Thinking of creating a memory quilt but not sure where you start? You’ve come to the right place. Here are five ideas to get you started.
Album Quilt
The oldest type of memory quilt is the album quilt or signature quilt. These type of quilts marked special occasions or were given as a gift when someone moved away. The album is not of pictures but of signatures.
The only requirement is the center of the block is either white fabric of a muslin in order for someone to sign their name. Once completed, you’ll have a living memory of that snapshot in time.
These can be made from a rail fence pattern or crazy quilt pattern or really any block where there is a blank space.
Photo Memory Quilts
You can now put yourself in your quilt. Or your kids or your family. Photo memory quilts are excellent gifts for grandparents.
Print out the picture on photo transfer paper and then iron it on your chosen fabric. Once you do that, you can use it just as a regular block.
You could put the pictures of far-flung family members in an I-Spy quilt or use each picture as the center of a star block.
These type of quilts are very versatile because wherever you would use a square in a quilt pattern, you can substitute the picture for it.
Clothes Quilt
Use the clothes of someone who has passed away as material for a quilt. For men’s shirts, there are now quite a few quilt pattern that use plaids. For ladies, you can use their fabric from their favorite formal dress or silk blouse as material in a crazy quilt block.
Every time you look at the quilt, you can smile because it is from a piece of clothing that your loved one wore.
T-Shirt Quilts
These are popular for a reason. If you have an athlete, sorority girl or frat boy in your family, they have plenty of t-shirts.
Take those t-shirts that would probably be thrown out and make a quilt out of them.
You just have to get over your fear of making a mistake. This is why I strongly recommend keeping ugly t-shirts around to experiment with as your first project. Get the interfacing and the dimensions right and then go to town.
If you are still unsure and you do not have a quilt design software, it is time to get out good ole graph paper and crayons to make sure you have the proper proportions.
Crayon Quilts
Want your gift to be a hit on Mother’s Day or Christmas? Have the little ones draw pictures as blocks with crayon quilts. Add Sashing. Present. Done. The receiver will have an original work of art that they will treasure.
So, there you have some ideas for creating your own memory quilt. Use one, two or all of the suggestions. The best thing about this type of quilt is that it is unique. And isn’t that a reason why we quilt, anyway? To create something unique?
====================gtg
Nine Patch Quilt Block – How to Make and How to Use
A nine patch quilt block is just about the easiest block you can make. It also has the benefit of being one of the most versatile. So, what is it and how can you use it to turn your scraps into something beautiful? Let’s find out.
What Is It?
It’s really very simple. A nine patch quilt block is made up of nine parts. These can be the same size or not. What makes the block is the contrast in values between the sections.
There will usually have light and dark value. Now, these nine sections can have all the same color like when you’re quilting a basic Irish Chain or They can have a variety of colors like the Puss in Boots block.
How to Make It
Strip Piecing is your best bet. For a standard 9 patch if you want a 6 inch block, you’ll need to cut out 3 – 2.5 inch strips of your dark or bright fabrics and 3 – 2.5 strips of your light fabric. Create 2 strip sets:
Dark-Light-Dark
Light-Dark-Light
Cut the strip sets 2.5 inches times the width of the fabric Sew them the in sets following ways to create your block:
Dark-Light-Dark
Light-Dark-Light
Dark-Light -Dark
How to Use it
Alternate with plain blocks
As mentioned above, you can create a basic Irish chain quilt. That is you alternate it with a block of the background fabric. The main color pop and it looks like there’s a chain. Another option is just to alternate the block with a plain block of the same size
Alternate with Half-Square Triangles This is something really simple that can pack a punch. First, look in your stash to see what you have a lot of. should be a dark color and a light color. Make half-square triangles blocks. Then make 9 patch quilt blocks that coordinate with these colors.
It works best if they fall between the color ranges and are in the same color family. By the same family I mean brights, country colors, civil war reproductions, that kind of thing.
You do not need the same fabric line, but you do need the same color family. As I’ve mentioned before on my scrap quilting page after you have created a few projects you will notice that you gravitate toward a certain type of fabric and this will not be a problem.
Sashing
Sashing is also an option. Don’t have a lot of time and need a quick charity quilt? It doesn’t get much easier than this. Instead of cutting 2.5 inch strips for your 9 patches, cut your strips 4.5 inches. That will finish as a 12 inch block. Set 3 blocks x 4 blocks with sashing and you’ve got yourself a quilt top.
Setting on Point
You can also set this on point using setting triangles.
Tools in Your Toolbox
A nine patch quilt block is a good quilt block to have in your quilting toolbox. It’s easy, lends itself to strip-piecing and versatile.
If you are a by-the-book quilter you can use this block and if you are a scrap/stash quilting who likes to quilt you can use it too. Simple doesn’t mean boring. The only limit really is your imagination.
===========gtg
Quilting Sewing Machine Selection Tips
Wondering how you should select your first quilting sewing machine? Confused by all the choices?
You don’t need to spend a lot of money when choosing your first machine. You just need to find the right machine for your specific needs. Here are some tips how to choose the right quilting sewing machine for you.
Tip 1 – Borrow a machine first
There are plenty of people out there who have mammoth singer sewing machines in their closets. Or they decided to catch the sewing bug only to lose it a couple of months.
Put the word out that you’re looking to borrow a sewing machine. You will want to complete your first project on a borrowed machine to figure out what you need.
While you’re working with this machine, write down all your wants. This may be a quarter-inch seam piecing foot, a walking foot and/or a quilting foot.
Also, write down all your problems. You will need this information when you go in search of your quilting sewing machine.
This will also let you know if you like quilting in the first place. If you don’t, you can stop now and you won’t be out any money. Just time.
In this case, you can stop now.
Tip 2 – Know Your Price Range
Know how much you are willing to spend on your new quilting sewing machine before you even start looking. Do not go to a specialty sewing machine shop and start drooling over models not in your price range.
Instead, make up your mind to get the absolute best machine that you can for the money you are able to spend.
Tip 3 Know What You’ll Be Using This For
Someone who primarily quilts mini quilts will need a different machine than someone who makes queen-sized quilts on a regular basis. The weekend quilter will probably need a different machine than a professional.
And, if you are someone who has all your work professional quilted or is primarily a hand quilter, then the fact that a machine comes with a walking and quilting foot would not be an advantage for you.
I’ve found that most quilters make baby quilts, lap quilts and art quilts. These are small projects that any regular sewing machine can handle. My sewing machine is a 3/4 machine, mini workhorse. I love it!
Tip 4 – Do Your Research
Sew on the machine you are thinking about purchasing. This is another place where it is helpful if you belong to a quilt guild.
If you are thinking of purchasing a machine, see if there is anyone in your guild who has a similar machine. It is always helpful to take the machine out on a test run.
If you have a sewing machine specialty shop, this is a necessity. The ones I’ve visited encourage you to bring a “quilt sandwich” to test out their machines. You could also bring some piecing. This is an investment.
Don’t forget about online resources. Nowadays there are ample reviews of sewing machines online that you can look over. Check out Consumer Reports ratings. Look at reviews on sewing forums.
Do your due diligence. Choose the right machine and you will not need to buy another one.
Tip 5 – Consider service after the sale
If you are going for a high-end machine, think about how you will get it serviced. What’s the point of having a Bernina if there is not an authorized dealer in your state? Could someone walk you through any glitches you may have? What’s the probability that someone in your quilt guild will have a similar machine?
If you are going to pay the money for a nice machine, make sure that you will be able to take care of it.
So, those are five tips on choosing a quilting sewing machine that suits all your needs. Because each person’s situation is so different, you will rarely find someone who will tell you straight out what you should buy.
Do your due diligence, ask lots of questions online and off, test different machines and you will find a machine that will last you for years.
======================gtg
Finding Quilt Ideas – Five Places to Look
Never be starved for quilt ideas again. You can find quilt ideas everywhere you look. The following are my favorite places:
1. Blogs
One thing great about the internet is that there are a lot of quilting blogs. Most of them belong to a group of similar bloggers so that if you find one you like you will be able to find another one. You can either follow these through your blog reader or subscribe through email.
2. Magazines
Yes, quilting magazines. I remember seeing one pattern on the cover of a magazine and liked it so much I made it at home. It was a simple pattern. I made the blocks bigger and changed the colors, but kept the same look.
You do not need to reproduce a pattern exactly. You can use it as inspiration.
And there are other magazines out there too. You may want to take your cue from apparel sewing. What is “in” right now? How are fabrics being combined? Try that with your next quilt or for the fashionista in your family.
3. Floors
Next time you’re in a building, look down. Tile floors usually have geometric designs that can easily translate into a quilt pattern. This is where having a camera phone comes in handy. When I see an interesting tile floor, I take a picture of it.
Same goes for carpets. If I find a color combination that works but I never would put together, I take a picture of it and think about using the combination in my next quilt.
By the way, looking up works, too. Older buildings have beautiful ceilings. It might spark something.
4. Art Museums
Don’t you go there to get inspired? Check with the museum regarding their policy concerning picture taking, taking notes and/or sketching. My local museum only allows writing in pencil in the gallery except for special sketching sessions. That’s fine. Just ask.
Something might catch your eye – the color, the composition or even quotes. Jot down whatever strikes you as being interesting and remember that you are an artist. Check on line and in person. Feed your creativity!
5. Antique Quilts
Get quilt ideas from old quilts. These can be from thrift stores, actual quilt museums or my personal favorite place – eBay. Seeing these pieces of history might spark something in your mind for your own quilt.
So those are some places where you can find inspiration when you’re starving. Be encouraged, quilt ideas are everywhere. You just need to look around.
================gtg
QBook Review for folks who don’t have time to quilt
Looking for a book of quilt square patterns? I’ve got the one for you. It has a long name, but it is a good addition to your pattern library.
It is called Quilting for People Who Still Don’t Have Time to Quilt by Marti Michell.
The book features strip-pieced, square patterns. This is an excellent pattern book to transition from being a beginner to an intermediate.
The patterns are arranged in order of difficulty. So, you can work from the front to the back to get a good handle on strip piecing techniques.
The first pattern in the book is a gorgeous, scrappy rail fence that is tied. Honestly, I don’t know an easier project you can start. The last is the Buygoyne Surrounded Basic.
The win for me for this book is that the author shows you how to break a pattern down into its individual units. You can learn how to “see” the blocks of a pattern.
There are also very specific information on how the projects pictured in the book were quilted such as the type of thread used and if it was stitched in the ditch.
I really love the reference section of these large pattern books and this one does not disappoint. Although detailed, I would not recommend this as your very first book. After you have your first baby quilt under you belt, this is a great first pattern book, though.
Instructions include variations on each pattern. Sometimes it’s how the quilt would look set on point. Other times there is information on how to reduce the size of the patchwork.
========================gtg
Quilting Tools for Easy Quilting
What quilting tools do you absolutely need to start quilting? Honestly, you really only need a good pair of scissors. You could make a totally hand-stitched and hand-quilted masterpiece.
And you could also get frustrated in the process.
With the addition of a few tools, you can make your quilting life many times easier. You’ll be able to piece faster and with more accuracy. Which will lead to more finished projects.
Best of all, you really do not need to buy the whole quilt shop, though you may be tempted. Hmmm… Or is that just me? Uh, sorry. Ready?
Let’s start off with a sewing machine . You just need a basic machine that sews straight. I piece and quilt on a 3/4 size machine I nicknamed Bernice.
Bernice works great. It has a straight stitch, a zigzag stitch and can sew through denim. It’s small enough to be portable. It does everything I need it to do.
That point is that you can start with any basic machine. Ask around. You will probably find someone who is not using their sewing machine. Ask if you can borrow it.
Don’t worry about getting a top of the line model now. You can always buy an expensive machine if you fall in love with quilting.
Are you looking for more information on how to choose first machine? Here are my top five tips.
The only attachment that I consider a must have is a walking foot. It is an attachment to your machine that makes it easier to machine quilt.
I did not last long without this attachment. It may have cost a third of what my parents paid for my sewing machine, but it was worth it.
If you don’t get a walking foot, you can still finish your quilt by tying or hand-quilting. Tying is quick and works well with some quilt patterns. You could try to machine quilt without a special foot, but it could be frustrating.
To cut your fabric, you will need a rotary cutter, self-healing mat and quilting ruler. These quilting tools work together to accurately cut strips of fabric. You may be thinking “what’s the big deal?”
These cut strips are then pieced together and sub-cut in blocks to make patterns without templates. They are definitely needed if want to finish projects quick and in a hurry .
There are, of course, more quilting tools out there. These are just the ones that I use on a regular basis with all my quilts.
===============gtg
Quilting Tips – Tips to make quilts easier and faster
If you want some easy quilting tips, you have come to the right place. Here are some tips that I have picked up over the years of doing more with less and tricking folks into thinking I’m a much better quilter than I really am.
Digital Camera
A digital camera is not just for taking pictures of the kids. I use my digital camera just about as much as I use my iron. Sometimes you can’t see a design because you’re too close to it. I take my digital camera and take pictures of different layouts of blocks. Taking pictures to document gift quilts is also a good use.
Invisible Thread
If I had known about the wondefulness of invisible thread earlier I’m sure I would have gotten up the nerve to quilt my first project sooner.
Invisible thread is exactly what it says it is – invisible. It’s a good tool for beginners because it means that your mistakes are not as obvious. After you’ve gained confidence, you can move on to colored thread.
The Kitchen Timer
The best ever quilting tool is my kitchen timer. I have found that I can do anything for twenty minutes. Seriously. Anything. And in twenty minutes you can get quite a few things done.
You can select a pattern and the fabric from your stash to make the pattern.
You can cut your fabric.
You can pin your strips for your strip quilting.
You can run a couple of strip rows through your sewing machine.
All you need is twenty minutes. In a pinch, you really only need ten. And once you have that time set out for yourself- you know that it’s is your time to quilt.
Goal Calendar
The best inspiration is a deadline. If you need to finish a quilt on a deadline such as Christmas or a baby shower, make a count down calendar. Take a calendar that is in your sewing place and put numbers from Day Zero to the current date. Each day, make a mark. This simple task will keep you on task.
Vision
Keep a picture of your propose completed quilt right above your quilting workplace. It will inspire you as you work through the more mundane parts of the quilting process like basting.
Make Your Own Quilt Kits
I always want to move on to the next project. I mean, that next quilt just seems way more appealing than what I’m currently working on. So, in order to satisfy my wonderlust, I just make my own quilt kits.
I include what pattern I want to use and cut the fabric strips and stick them in one of those gallon zip lock bags. I also write down some notes on a 3 x 5 index card such as the possible recipient, some variations of the quilt theme and stick it in my stash closet.
Now, all my fabric is there when I need it and now I have the inspiration to continue the project I’d been meaning.
Those are just a couple of my quilting tips.
==============gtg
Scrap Quilting Tips
If you have ever wanted to try scrap quilting, but was concerned about the finished product, this is the place for you. Here are some tips to get you through your first a hundredth scrap quilt.
1. Mindset – It’s an ExperimentThis is not a gift for your mother-in-law or the first grandchild in the family. Decide from the start that whatever the outcome, this quilt will hold a place of honor in your linen closet for cold winter nights.
Just knowing that this quilt is for you, will take the pressure off. You can experiment and play with fabric. There is no deadline. No pressure. No worrying about what people will think or if they will be sufficiently appreciative of your work of art.
Nope. This baby is all yours.
2. Choose your color palette – rustic or bright or pastel
Chances are that you gravitate towards the same types of fabric. There are people who love bright colors. Then there are folks who have more of a country palette. When you start looking at your fabric stash for your project, you are going to find out something about your tendencies.
Stick to one overall color palette. As a quilter, you know that there are a million and one colors that can be green. A hunter green is different from a true green and that’s different from an apple green. If you’re going country, then make sure all the colors are all of that dark hue. Brights go all together.
If something doesn’t quite fit in your scrap quilt, you will know it, too.
3. Use the camera’s black and white feature for values.
If you can’t tell if the fabric value is dark or a medium or a light, Set your camera on black and white and snap a picture. You will be able to tell the different values better when you look at them compared to each other.
4. Wait Overnight
Sometimes we look at our creations and just shake our heads. Most of the time when that happens it is because we are too close to it. Let it sit overnight. Better yet, take a picture of it. Sometimes we can see something different in the picture than what we see on our design wall.
5. The Goal is to Learn something
Nothing is ever wasted as long as you can learn something from the experience. Take what you have learn about color and fabric selection for your next quilt. Stretch yourself.
See. There is nothing to be afraid of scrap quilting.
One of my favorite sayings is that when life gives you scraps, make a quilt. So, get going and try going scrappy!
=====================gtg
Quilting Design Software: The Top Picks
There are actually hundreds of different options that you have when it comes to quilting design software, but of all these, there are a few quilting design software programs in particular which are going to be worth you checking out, and which will be discussed here in more detail for you.
Quilt Design Studio
One quilting design software program that you may want to purchase is Quilt Design Studio. This is a super easy to use software that will help you become the best quilter you can possibly be. It is also affordable which is nice because then you do not need to worry about spending a fortune just to improve your quilting talent.
This quilting design software program includes 200 pre-drawn quilt blocks and a palette of 3,000 quilting fabrics, which is very impressive and makes it ideal for use whether you are a beginner quilter or experienced. All you need to do with this quilting design software program is choose your layout and then add borders and sashing with the click of a button.
They have a quilt block library which is sorted by block type, such as four-patch and nine-patch for instance, and this makes it very easy to navigate.
You can even use this software to print your projects as full-page drawings, and the program is able to create yardage estimates for you, complete with fabric swatch samples.
There are no other quilting software programs like this one out there today, and complete manuals are even included with this program. The software’s movie clips are very helpful, and animation and voice explanations illustrate exactly how to use important tools. No matter what questions you may have when you start using this software, you will find the answers in the Help section, so you will never have to worry about getting confused and not knowing how to use the software.
Also remember that you can use the Internet for much more than just finding a quilting design software program, and in fact you can find anything you need, from quilting tools and materials to a free quilting design.
Make sure that you take some time to read some reviews before you actually go out and purchase this software, just to see what other consumers had to say about it and get a better idea as to whether or not you think this software program would be right for you and if you would enjoy it.
================gtg
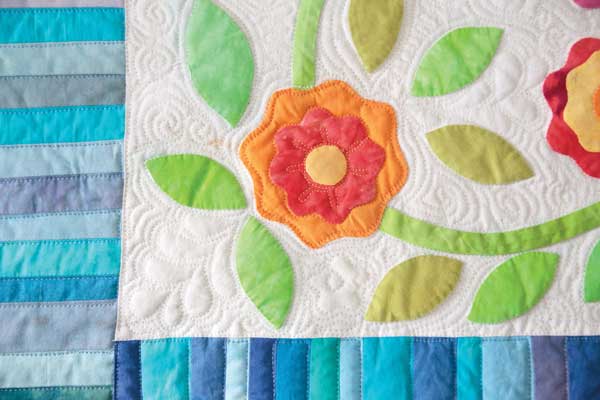
Quilting fabric
Quilting is a fantastic hobby, one that everyone and anyone can enjoy. It is not difficult to learn, and does not take up a lot of your time so you can do it in your spare time during the day. If you are interested in learning how to quilt, there are a few steps that you will need to take and a few things that you will need to be aware of. The Basics In order to prepare for quilting, you will first need to decide is what designs…Quilting is one of the most popular hobbies these days, one that anyone can do. It is not only enjoyable but as well you can end up with some beautiful creations that you can either keep for yourself or give as gifts to your family or friends.
If you are interested in quilting, you will first need to purchase the right quilting fabric. There are lots of different options that you have to choose from here, and it really all depends on what type of quilting pattern you choose which will…There are quite a lot of different types of fabric that can be used for quilting, but the cotton quilting fabric is certainly the most popular, and for good reason. For one, the cotton quilting fabric is very versatile and can be used in most quilting projects. It is also very comfortable, so whether you are making a quilt for a bed or quilting a piece of clothing, it will feel good against the skin. Cotton quilting fabric is also very affordable, which is especially nice if you quilt frequently and do not…Yes, you absolutely can find discount quilting fabric, as long as you shop at the right places. Whether you are looking specifically for Moda quilting fabric or any other type, there are various retailers that you can go through and always rely on to find the best value for your quilting fabric. Fabric Blowout As the name implies, this is a company that is always offering blowouts on their fabric selections. They offer an array of discount quilting fabric that you can choose from, and here you can find…Anyone looking for flannel quilting fabric or any other type should know that they can rely on the Moda quilting fabric that is available. With the Moda quilting fabric you know that you are getting the highest quality quilting fabric and at the most affordable price. The Moda Company offers an array of different quilting fabrics to choose from, all at unbeatable prices. What’s New One of the best things about the Moda quilting fabric company is that they are always updating their selection and offering new and exciting…Just as there is for Christmas quilting fabric, there is are various patterns that you can complete using flannel quilting fabric. Of the thousands upon thousands of different flannel quilting fabric projects that you may be interested in, here is one that you will definitely want to try. Scrappy Flannel Quilt This is an easy quilt pattern that you will definitely want to try if you have some plaid fabric. First you want to get the flannel quilting fabric that you need and then wash and dry all fabric together…
====================gtg
Can You Find a Free Quilting Design?
One thing that all quilting enthusiasts wonder is whether or not they are ever going to be able to find a free quilting design. This is important, especially if you quilt for a living, you are going to need to get quite a large quilting design template collection, and if some of these were not free quilting design options, you would be spending a heck of a lot of money.
Fortunately, you are able to get a free quilting design, and the best place to find a free quilting design is on the Internet. Of all the different online companies that you can go through to find a quilting design for free here are a few of the best and which you will definitely want to check out for yourself.
All Crafts
This is one company that you can go through if you want to find a free quilting design. All Crafts is a company that is renowned in the world of crafting, and in particular quilting. They offer not only quilting designs and projects that you can choose from, but as well quilting tools and materials to help get you started and ensure that you always have the most success with every quilting pattern that you take on.
They offer quilt blocks and patterns, rotary cutting and quilt marking tips and tricks, and as well technique advice on quilt care, borders and finishing a quilt, quilt racks and hangers, computer quilting, appliqué, hand quilting and piecing, and more.
Free Patterns
Another company you may want to check out if you are looking for a free quilting design is Free Patterns. Here you will always find exactly what you need, because they already offer one of the largest selections of quilting projects on the Internet today, and then they are updating and adding to their collection every day as well.
They have some great tips and hints offered on quilting, so if you are a beginner just getting started you will have the most success and be able to learn about the different quilting terms and techniques, which may be confusing to you at first otherwise.
Quilting is a really great hobby to get into, but the best way to do it is to get yourself as educated as possible first, so that you best understand the hobby and how to get into it. This way you will not end up feeling lost or confused when you start your first project.
================gtg
Where to get a Machine Quilting Design
There are many different resources that you can use if you want to find a machine quilting design, but the best resource of all is the Internet. It offers the largest machine quilting design selection for you to choose from, and as well, because of the fantastic search engines offered by the Internet, if there are any specifics that you are looking for in a machine quilting design, you just have to type this in and then you will be presented with the best results.
Skill Level
There are a few different things that you are going to need to take into consideration when it comes to choosing a machine quilting design, and one of these is your quilting skill level. This is very important because of course if you are just getting started in quilting, then you are not going to be able to complete the same difficulty of projects as you would if you have been at it for years.
Software
Not only can you find a great machine quilting design selection online, but as well quilting design software that you can use to get better at this hobby and really start creating some fabulous projects.
There are quite a few different software programs out there that you can choose from, and you can go through The Quilt Software Network to see all the different software programs that you have to choose from, and a detailed review on each. This way you can better understand what each has to offer you and make the best decision in terms of which is going to be right for you.
Tips and Tricks
Another way you can use the Internet to benefit yourself, other than using it to find a machine quilting design, is so that you can get lots of different tips and tricks which will help you to become a better quilter. Tips such as learning how to see if your fabric will bleed for instance, will ensure that all your projects come out as successfully as possible.
Quilting is a really wonderful hobby, one that anyone can get involved with. No matter what your age or gender, you will surely love quilting, and even though you may find it difficult at first, as long as you stick to it and keep trying, and have patience of course, you will progress and soon enough be a pro quilter.
====================gtg
Quilting Design Template: What it is
Quilting is a really wonderful hobby now. No matter how old you are, you can have fun in quilting. It is similar to knitting and crocheting in some ways, but very different as well. Quilting is very relaxing and stress relieving for one, which is a main reason that so many people love to do it, but there are other fantastic reasons that you should start quilting as well. For one, you can end up with beautiful creations. You can quilt blankets, shirts, and make wall hangings, and you can either keep these to decorate your own home, or you can give them out as gifts to your friends and family.
What better way to show your loved ones just how much you care than by quilting them something spectacular, and there are so many great patterns that you can choose from it is really incredible.
Quilting Template
If you want to come up with a really great quilting design idea, the first thing you will have to do is figure out what it is. The quilting design template is basically the design that you are going to be following. There are the instructions which describe to you what you are going to be making and how to do it, and then there is the template which is a picture of the finished project.
A quilting design template is very easy to follow because you can keep looking at it while you are quilting and following the pattern, to make sure that yours looks like the quilting design template and make sure that you are on the right track.
If you are just following along with the instructions you may think that you are doing things right but then end up making it halfway through only to realize that you did something wrong and have to start all over.
Where to Find
If you want to find one of these templates so that you can use it in the future, the best resource available to you here is going to be the Internet. There are literally thousands of different quilting-websites that you can check out, and which will offer you what you are looking for here
As you can see, paying attention to your quilting design template is going to be very important, and something that you are going to want to make sure that you do with every quilting project in the future.
=====================gtg
How to Choose a Quilting Design
If you want to choose a quilting design, of course you are going to want to choose just the right one. This can be hard, as there are so many different quilting design options to choose from, and so many different places to go for them. You can use the Internet, you can read books or magazines, the options are almost endless here.
Just make sure that you choose a quilting design based on your skill level more than anything. If you are just getting started quilting, you are going to want to get a beginner’s quilting design, whereas if you have been at it for years, you are going to be able to get more of an advanced pattern.
Another decision that you are going to have to make here is whether you want to get a machine quilting design or not. This means whether you want to complete the pattern by hand or if you would rather use a machine.
Where to Look
Now that you have decided the basics of what sort of quilting design you are looking for, you just have to know where you can go to look for your pattern. The Internet is usually the best option for this, because you can just type in what you are looking for and find exactly what you need.
This will not only save you the most time, but as well money because you can often find free quilting patterns when you are searching online. A great online company that you can go through if you are looking for quilting pattern is the Quilter’s Warehouse. Here they offer not only thousands of different quilting projects that you can choose from, but as well all the different tools and materials that you would need to get started, so they are the perfect one-stop shop for all your quilting needs.
===========================gtg
Learning About Quilting
Quilting is a fantastic hobby, one that everyone and anyone can enjoy. It is not difficult to learn, and does not take up a lot of your time so you can do it in your spare time during the day. If you are interested in learning how to quilt, there are a few steps that you will need to take and a few things that you will need to be aware of.
The Basics
In order to prepare for quilting, you will first need to decide is what designs the stitches will make. If you want to get a more traditional look, you need to outline the important content of the project with quilting, and a grid of stitching works well in background areas. You can always choose smaller areas to incorporate fancier design elements as well.
Choose Your Pattern
Now you are going to need to select your quilting pattern. Make sure that if this is your first time quilting you choose a simple pattern, one that you are going to be able to complete and not get frustrated or bored with.
You can purchase a pattern book which will come with a wide array of different patterns for you to choose from, or you can find a free pattern online. Your options are almost endless here, and so you really just want to make sure that you select a pattern that suits your skill level and which you are going to have fun with.
Gather Materials
You will also need to gather the necessary materials for your quilting pattern, first and foremost you will need to get your quilting fabric. You will need to pay close attention to the materials that the pattern calls for, remember do not start substituting materials, at least not until you have an excellent grasp on the quilting hobby and understand it better.
This is a really fantastic hobby and whether you are a teenager or a grandmother, you should definitely try it out. You can do it in your spare time during the day, and also you can come up with some absolutely beautiful creations. For any special occasions coming up what a perfect way to show the special people in your life just how much you care by making them a quilt.
Make sure that you put some thought into the design, which to choose and which elements to include, so you can personalize it as much as possible.
===================gtg
Using A Hand Quilting Frame To Make Mementos
If you are looking for a hobby quilting may be something you want to try. You can make make wonderful vintage quilts and if made properly can last for a lifetime and then some. Using a hand quilting frame is not as difficult as it looks and pretty much anyone with the right amount of desire can begin using a hand quilting frame if they are willing to put in the time needed.
Why Use A Hand Quilting Frame
The main reason people will choose to use a hand quilting frame over a machine one is the authenticity of doing it that way. Creating and designing your own quilting frame pattern is a skill that can really only be done by hand. There is something about working on a hand quilting frame that, for everyone, is relaxing and soothing. When I see the finished product and know that I stitched and assembled every piece of it, nothing can compare to that sense of pride. While a machine quilting frame will go much faster, they are loud, expensive, and take up a lot of space. Using a hand quilting frame is something you can do at night to help you wind down and relax after a long day.
I often found myself watching television while my hands just worked away on the quilt. I was amazed at how quickly I could get the handmade quilts done and also at how beautiful they came out when I was finished. Now it’s not something that everyone can describe unless you have done it yourself.
There are some things you do need to consider before you get started on your project. One is how many quilts you plan to make and who you intend to make them for. I am not saying you need to plan out and decide every single quilt that you are going to make, however it is a good idea to have a plan in mind before you go out and buy materials so that you can get some of the items you need in bulk in order to save money. Batting is a supply that goes in every quilt, so I invite you to find one you like so that you get enough to complete your handmade quilting projects. You should also buy as much thread as you can to do your intricate stitching.
By now you should have an idea of what working with a hand quilting frame is all about. If you think you might be interested, start small and see how it goes.
======================gtg
What Is A Machine Quilting Frame?
If you are looking to start quilting the easiest way to get started is using a machine quilting frame. Now realize why you need to take a look at a machine quilting frame and see why they are so nice to have. They are completely different from a hand quilting frame, however the end products are nearly indistinguishable. I have used many a machine quilting frame and believe me, they speed up the time so much that it would be almost impossible to go back.
Features Of A Machine Quilting Frame
A machine quilting frame is very similar to a sewing machine. In fact, many machine quilting machines can be used as a sewing machine when not being used for quilting. The process of doing machine quilting is similar to using a sewing machine in that the fabric is fed in and sewn together. Usually however a machine quilting frame will be far larger than your typical sewing machine.
In order to use one you take the layers of your quilt and stack them together. You layer the top, the batting, and backing out on a flat surface, usually either a very large table or the floor, then tack or pin everything together. Most people prefer to use large safety pins for this part of the process. You then take the pinned together material and lay it out on the machine quilting frame. In contrast to an expensive Longarm machine, you will have to move the quilt through the machine yourself.
By using a machine quilting frame you can get a high quality quilt done in a fraction of the time it would take to do by hand. While they are nowhere as fast as a Longarm quilter, a home machine quilter can take you from fabric to a quilt in about a day. For some people this is not nearly as satisfying as doing the quilt by hand, but if you are planning to do multiple quilts or even thinking about making them to sell it is a must have.
You can use a machine quilting frame to start a fairly lucrative home business if you have a place to sell them. I have been making and selling quilts for some time now and have found it to be very profitable. This would not be the case without my machine quilting frame however. If you are serious about quilting, now it causes you to see that you should take a look at one.
=============gtg

 ================
 ===================
 Quilting for Profit | All About Quilting Online Info